FLV to PSP movie
This tutorial shows a step-by-step demonstration to you about converting videos downloaded from YouTube, Google Video, MySpace etc. Enjoy them on your Sony PSP. First of all, we must make it clear that YouTube videos and Google videos are Flash Video files ending with the extension *.flv.
What is FLV?
FLV, or Flash Live Video file, is a preferred file format that is designed for web playback, offering high rates of compression to deliver video over the Internet using Adobe Flash Player.
FLV content cannot be played back directly and it must be embedded in (or linked from) an SWF file. You create (or download) a “container” SWF file to play FLV file. The most common approach is to use an SWF file that functions as a media player with screen and playback controls. Notable users of the FLV format include YouTube, Google Video, Reuters.com, Yahoo! Video and MySpace. To convert video to FLV, use Flash Video MX
How to download FLV?
With the help of FREE download program: FLV downloader, you can download video off YouTube, Google Video, MySpace, Metacafe, Dailymotion, iFilm, Music, eVideoShare, StreetFire, etc. and save them to hard drive of your computer in FLV format - use FLV Player to view it.
1. Launch Moyea FLV to Video Converter Pro 2
In order to finish this guide, please install the Moyea program of FLV conversion. Once Moyea FLV to Video Converter Pro 2 is installed, launch the converter program. Click on the “Add FLV” button on the tool bar to import your target FLV files into the program.
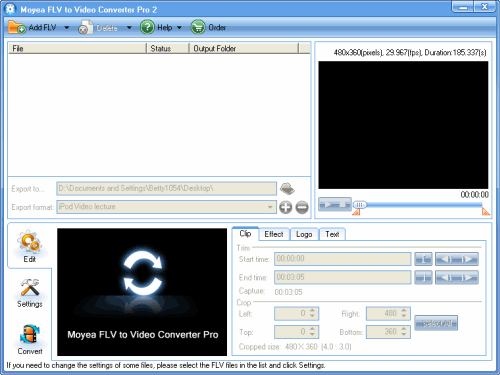
2. Edit FLV Files
You can edit FLV files after importing videos into the program.
Clip the video by trimming and cropping:
Trim the video length to obtain the video clip you like by dragging slide bar under the preview pane. With cropping function, you can easily cut off the boring black edges around the video.

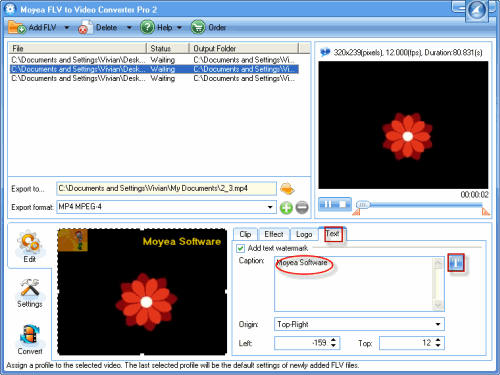
Add logo or text watermark:
Adding logo or text watermark will highlight or protect your personal video. Click “Logo” tag and import the image into the video. You can set the transparency effects after you click the wrench icon. With setting “Origin”, it is easy to locate the logo position. In order to change the logo size, change the values of “Width” and “Height”.
![]()
In “Text” tag, type the text you want to display on the video. Click “Text” icon to set font, size style and so on.
3. Select the output format, output path and change the audio and video settings
Choose “MP4″ as the file format in the pull-down menu of “Export Format” and specify the location of the output files on your PC in “Export to…”. Click “Settings” to configure the video and audio settings including bit rate, frame rate, video coedec, etc.

4. Convert
Click “Convert” and hit “Start” to begin conversion. After finishing encoding MP4, you can find the converted MP4 files in the folder that you specified. Now it is time for you to transfer the videos to PSP using the data wire and enjoy them on your PSP!

No comments:
Post a Comment