Tuesday, March 31, 2009

Convert flv to avi and edit for Mac

convert flv to AVI, MPEG, MOV on Mac :

Step1. Install and run Aimersoft flv Converter for Mac, click the “Add” button to import your flvs. This flv Converter for Mac support batch conversion, so you can import multiple files at a time.

Mac flv converter interface

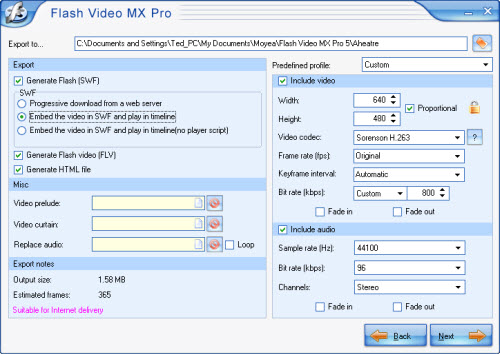
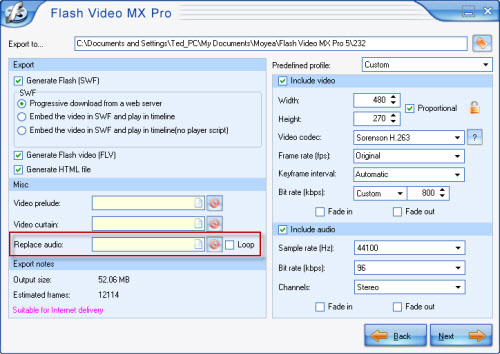
Step2. This software can convert flv to various flv formats for iPod, iPhone, PSP, Zune, cell phone, etc. Click the “Format” drop-down list to select the format you prefer for each added file. If you don’t know what formats your device supports, you can just select the format according to the device name.

Aimersoft Mac flv converter output formats

If you want to customize the output quality, click the “Settings” button to open the Settings panel, where you can set resolution, frame rate, flv bit rate, audio bit rate, sample, etc. Since Aimersoft flv Converter for Mac supports batch conversion, you can use different profiles for the added flv files to save your time. If you don’t want to do these settings, the default settings will just work perfectly.

mac flv converter setting

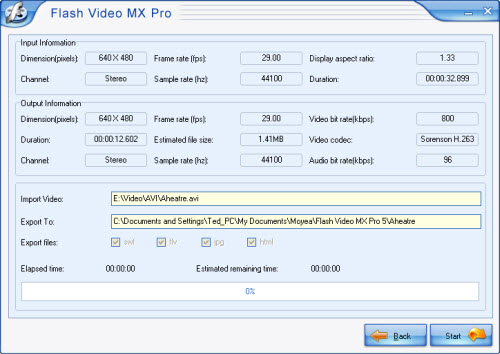
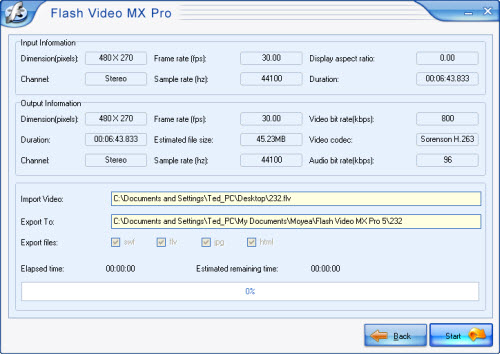
After all you finish the above steps, click “Start” to begin the conversion.

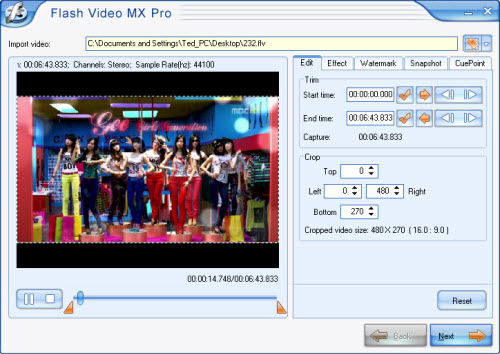
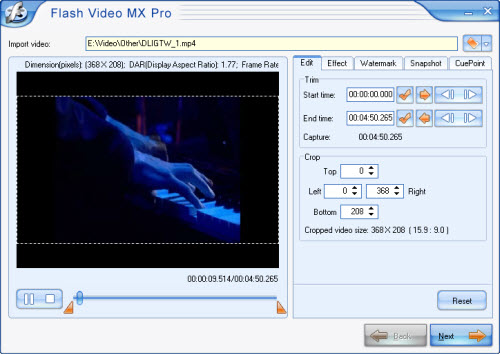
trim, crop, join and edit flv

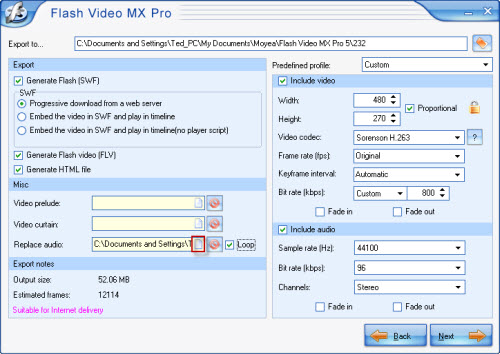
If you want to cut the black edges off your flv, you can click the “Crop” button to open the crop panel. There is a frame in dashed line around the movie flv; you can drag it to cut off the sides you don’t want. You can also type in values in the four Crop value boxes to crop your flv more accurately.

mac flv converter crop flv
If you want to join several flv files into one single file, on the main interface, tick the check box “Merge into one file”, and you will only get one output file instead of multiple files.

mac flv converter join flv

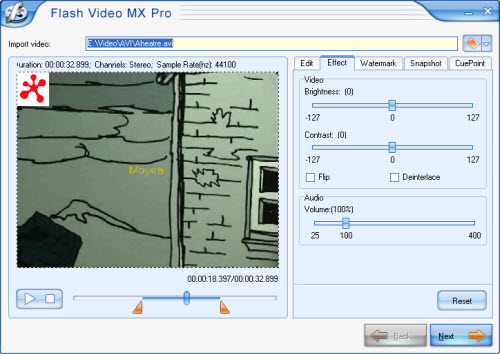
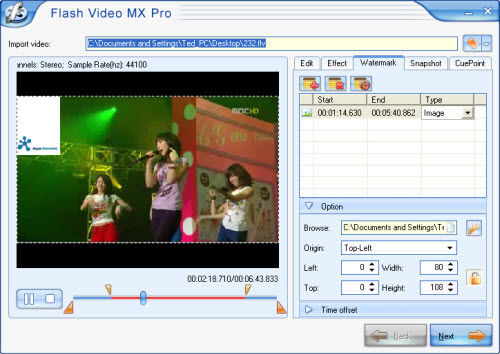
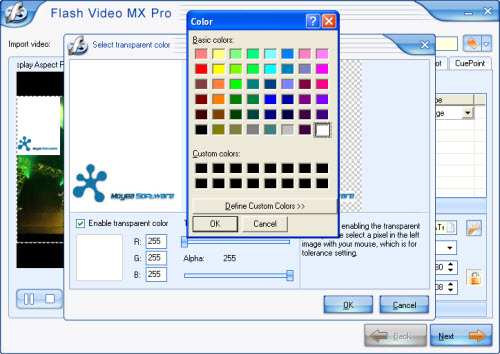
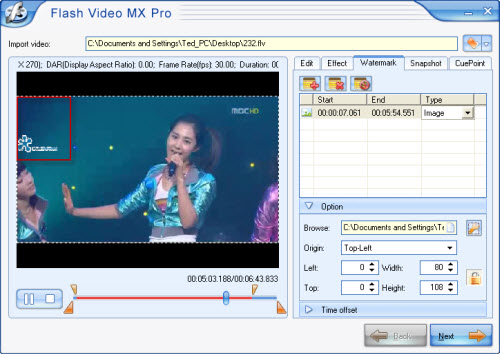
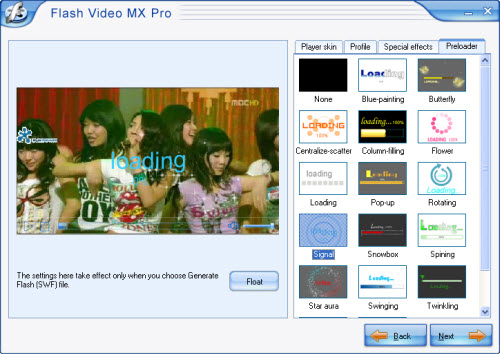
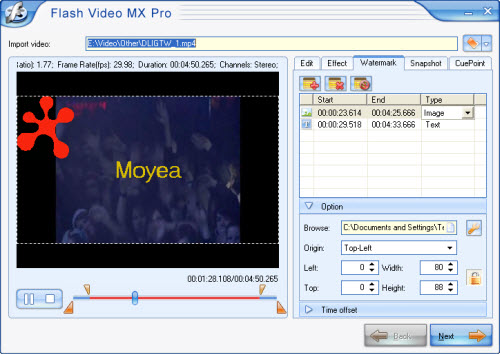
This flv converter provides rich flv editing functions, you can click the “Effect” button and customize the brightness, saturation, contrast; volume, etc on the Effect panel. You can even apply special effects such as “Emboss”, “Negative”, “Old film” and “Gray” by selecting a special effect from its drop-down list. If you want to remove the original audio, you can convert your flv with 0% volume.

mac flv converter effect setting

Download YouTube FLV to iPod, iPhone, Zune and cell phone on Mac?

FLV files downloaded from YouTube are streaming FLV. You have to convert them to MP4 or WMV for transferring them to your iPod, iPhone, PSP, Zune or cell phones. If you don’t know how to download YouTube FLV to your MAC computer on Mac OS X, you can refer to this guide:

http://www.flv-to-video.com/flv-solutions-for-mac

After you download YouTube FLV to your MAC computer, convert them with FLV Converter for Mac and use iTunes or Zune software to transfer the converted FLV to iPod, PSP, Zune and cell phone. See the detailed information here:

http://www.flv-to-video.com/convert-flv-to-ipod-on-mac-os

Convert FLV to MP3 and WMA on Mac

If you want to convert FLV to MP3 or WMA for your portable player such as iPod Nano, iPod Shuffle, Creative Zen, Zune, cell phone and so on, this software can extract audio tracks from your FLV to MP3, WMA, WAV, AC3, AAC, and M4A etc. supported by these players. After you load your FLV files, in the main interface, select MP3 as the output format, and then start conversion. If you want better music quality, you can select a higher audio bit rate and sample rate in the Settings panel. See more Mac solutions by visiting the following URL:

http://www.flv-to-video.com/mac-video-converter-player

After the conversion, drag the converted audio files to iTunes library, connect your iPod Nano or iPod shuffle to your MAC computer, click iTunes “File -> Sync iPod”, and click OK. If you don’t have iTunes, you can download it for free from Apple’s official site:

http://www.apple.com/itunes

For PSP, just copy the files to the “Music” folder on your memory stick.

For Zune, just drag and drop the files to your Zune software, and click “start sync”.

Friday, March 20, 2009

How to embed video and FLV player into the website?

As a web designer, every body wants his website to be beautiful. But apart from the font and picture, what will be new to keep our clients? A video, embed a video, better with a beautiful player, on your web of course can attract more people to view your website. But how to do this is still not easy to answer. Actually you just need a good software.

This article will tell you how to embed video and FLV player into your website with one application.


What we need?

1. FLV movie. FLV is the most popular video format of on-line streaming because it has good quality and small size. So the first you need to do is find FLV video or convert your video to FLV format.
2. A beautiful player, if you just embed a video on your website but your clients can not control it themselves, it also can not keep you clients. With a beautiful player, you can make your video more attractive and give your clients more choice.
3. A webpage which embedded a video. If you know how to make webpage and how to embed video on it, that will be simple. But if you don’t know you also can get one with some software.
4. Moyea Flash Video MX Pro. This application can provide all the above things to you.

What Moyea Flash Video MX Pro can provide you?

1. It can easily convert video and DVD to Flash, FLV encoded by Flash 8 with alpha, AVC/H.264, Flash 8, and Sorenson Spark video codecs, together with dynamic video compression and audio settings!
2. It can generate a SWF file, which is the FLV player. Or embed the FLV into the SWF.
3. It can generate a HTML file; you can use it as a webpage directly or use its codes.

How to use Flash Video MX Pro to do these things?


Let us take an AVI file for example.

Steps:

1. Open Flash Video MX Pro, and import the video in the program.

Under Edit", you can trim a video clip, crop a video area.

Under Effect", you can adjust the video effects, like contrast, brightness, etc.

Under Watermark", you can add a text and image watermark to your video.

Under Snapshot", you can capture a random image from the video.

You can see the effects in the following picture.

Click Next" to continue.

2. In Export", check Generate Flash", and click Next" to continue.

Here you can embed the video in SWF, but if you want to get the HTML file you need to choose Generate HTML file.

3. Under Player skin, choose your Flash Player skin from the categories: Classic, Opaque, Translucent, and Transparent.

Here you see you have many beautiful player skins to choose. And you also can add preloader and special effects.

4. Under Profile, select a Player profile in the drop list, or custom a profile and save it for later use by clicking "Save".

5. Click Start to launch the conversion

Wait a few minutes; you can get your .flv file, .swf file and .html file.


How to add your own music and photos to a YouTube video clip?

"I want to add my own music and photos to a YouTube video clip but don't have the budget to buy Adobe Premiere.” Do you have the same problem? Yes Adobe Premiere is too expensive and until CS3 it can not support importing FLV format file. The lack of FLV edit software really brought mess to our work. But now you can get released from high price and useless functions, because Moyea Flash Video MX Pro can help you.


This software cost less but has powerful abilities like: trimming, cropping, adding picture/text watermark, replacing audio, converting video to FLV and adding beautiful player skins etc.


This article will teach you how to add your own music and photos to a YouTube video clip.

After you install and launch the program, you can see this interface.

Step1. Import video

Import your .flv file and you can see it in the preview panel.


Step2. Add image to your video

Choose Watermark section, click Add watermark button> Add Image> choose the picture you want to add. Then you can see the effect in the following picture.

Here you also can set the background of your picture to transparent by click color.jpg, into this interface.

Set the background color to white. See, the background becomes transparent.

Of course you also can set the Option and Time offset of your watermark in this section.

Step3. Replace the audio

Click Next, you can see this interface.

Here in Replace audio section (red marked), you can replace the original audio to your own audio. Say, your favorite song.

Click the red marked button to add audio, and if you select Loop that means if your audio is shorter then the video, the audio will keep playing from the start automatically.


Step4. Add player skin and preloader

Click Next, into this interface.

This software provides many beautiful players, preloaders and special effects to bright your video.


Step5. Conversion

The final step, click OK and wait a few minutes you will get your own FLV file.

How to convert video to SWF format?

A few days ago one of my friends asked me how to convert his videos to SWF format so he can upload them to his website to broadcast his company. Actually it is simple what we need is a video to Flash converter. It is easy to say but find the best one is difficult as there are so many similar applications on the market. Here I recommend Moyea Flash Video MX Pro. This software can support imputing nearly any video format and export .flv file, .swf file and .html file. You can use the .html file as a webpage directly.


This article will tell you how to convert video to SWF directly.


After you install and launch the program, you can see this interface.

Step1. Import video

Let’s take an MP4 file for example. Import the video and you can see it in the preview panel.

Here you can edit your video like trimming and cropping, adding watermark on your video, setting brightness and contrast, even capture a snapshot of your video. Now I will teach you how to add a logo on your video. This software allows you to add an image watermark or a text watermark. Choose Watermark section, press add button, and you can choose add an image or a text watermark.

After you add the watermark, you can see the effect like this:


Step2. Output settings

In this section, you can choose the output folder and output formats. Here are three choices for you to choose "Generate Flash video (FLV)", "Embed the video in SWF and play in timeline", and "Generate HTML file".

If you want to convert your video to SWF file only please select Embed the video in SWF and play in timeline or do not select Generate Flash video (FLV). As a default this software can generate a FLV file, a SWF file and a HTML file, if you want to upload your video on your website please put all these three files in the same folder and the HTML file can be used directly as a web page.


Step3. Add player and preloader

As you see in above picture, you can add a player skin and preloader on your video and with beautiful special effects.


Step4. Convert

In the final interface, just press the Start button you can get your SWF file in a few minutes.

FLV to AVI - for playing/editing on windows media player!

FLV to AVI movie
This tutorial is to show you a step-by-step demonstration of converting FLV videos downloaded from YouTube, Google Video, etc, to AVI for enjoying on your DV, inserting into PPT, editing in windows movie maker, playing on Windows Media Player, and so on.
First of all, make sure that the YouTube videos and Google videos communicating online are of the Flash Video file, or FLV file format.
Download and launch Moyea FLV to Video Converter Pro2
In order to finish this guide, please install the Moyea program of FLV conversion

flv to avi
Add File
Click on “Add FLV” icon to import target FLV file into the program. Moyea FLV to Video Converter Pro2 supports all kinds of FLV files without installing extra codecs; The programme supports the FLV files such as On2 VP6 video FLV, H263 video FLV, NellyMoser audio FLV, etc.
Edit

Here you can edit the video by cropping and trimming, adjusting the effect, adding logo and text.

edit flv

3. Settings

settings avi
Select “AVI” in the pull-down menu of “Export format” as the format of the output video file.

In the panel of “Include Video in Output File”, you can change the video settings: video codec, frame rate, resolution (frame size), etc.

The size of the AVI file depends a lot on the chosen video codec. The old codecs shipped with Windows, such as MJPEG, Microsoft Video 1 are not very efficient. You can use additional codecs from Microsoft or the third party codecs to reduce the file size. DivX and XviD are two of the third party codecs, which produce video with excellent quality and smaller file size. The two are based on MPEG-4, and both can be used with the AVI file format.

However, if you use any non-standard codecs from the AVI file, please keep in mind that the viewer of the created video must have the codecs installed on their PC, too, or your file may not be compatible with all video editing software.

In the panel of “Include Audio in Output File”, you can change the video settings, such as the audio codec. Depending on the codecs, you may also change the sample rate, channel, audio codec and bit rate.

If you choose “mp3″ as the audio codec, you may encounter some problems. For example, the MP3 compressor does not work correctly in video files and often causes the conversion to abort in the middle. So we suggest that use other codecs instead of mp3 will be better

4. Convert

Here you can choose an export rout by clicking on the browse button, then press “start” to convert.
avi converter

After conversion, mission accomplished! Then you can get AVI file.

How to convert FLV Flash video to Apple TV with Moyea FLV to Video Converter Pro 2

A lot of friends are asking me how to convert FLV to Apple TV movie. I have told those one by one. And now, I would like to share my knowledge of this respect with more people who have the need to play Flash video on Apple TV. This guide is written for Apple TV users to explain how to play back your favorite FLV Flash video files on the Apple TV at home. The guide is easy to follow and doesn’t require technical knowledge of multimedia.

Requirement: To finish this guide, it is recommended to install Moyea FLV to Video Converter Pro 2 on your computer.

For Apple TV users, you can either buy movies and songs from iTunes store and transfer them to Apple TV, or find the proper video program to convert your favorite video files to Apple TV movie.

FLV to Video Converter is a fine utility for FLV to conventional video conversion. I have tried it multiple times and find it works smoothly. This program is a fine FLV to MP4 Converter and could efficiently convert FLV to MP4, which is compatible with Apple TV, iPhone, iPod, PSP, etc.
It also supports H.264 encoding which provides higher video quality.

Step 1. Launch the FLV to Apple TV Converter
After launching this program, you will face the following interface, which is quite easy to use. Import your source FLV (Flash video) into the program. It will be played back by default in the preview panel. If you import not only one file, you must select the right file in the list, and do the other settings.

Tips: There are two ways to import source FLV files into the program: From Folder on the hard disc; From IE Cache.

Step 2. Clip an Area & Watermark the Video
In the step of editing, you have the access to leave out those unwanted areas of the video image for the conversion. You can crop the video by dragging the edge of the dot frame on the left preview pane, or change the value in the dimension boxes. To trim the video, you can either drag the slide bar under the right preview pane, or set the “Start time” and “End time”.

Besides, this program could meet the advanced requirements in the FLV application: you can add the logo or a text as the watermark of the output file, and you could specify the position of the watermark. You are also able to set the transparent color for the image and font for the text.

Tips: The red marked button in the following picture is for setting transparent color. Under “Text” tab, the “T” button is for setting the text font.

Step3. Change the Audio & Video Settings
Before you do the settings, you must select the right output format with the pull-down list of “Export format“. Click on the folder icon right behind “Export to…“, you can change the output path. And then you select your favorite one among the choices of Apple TV. Click on the tab of Settings and go on to adjust the audio and video settings for the output Apple TV movie.

The codecs are set properly. If unnecessary, just leave it by default.
It is suggested that while specifying the frame size of the video, make sure to check the box of “Proportional” to keep the original ration of the image.

Tips: For advanced users, they could select to change the video frame rate, video bit rate, audio sample rate, audio bit rate, channels, etc.

Step4. Convert

Choose the tab of “Convert” and click “Start“. The program will help you to encode the FLV file into Apple TV movie format. Then, load it to your Apple TV, and enjoy it anytime anywhere!

Convert Video from FLV(Flash Video) to AAC(iTunes Audio) with FLV to Video Converter

  • FLV to AAC
    This tutorial is to show you how to convert music videos downloaded from YouTube and Google Video, etc. to AAC for digital audio. First of all, we have to make it clear that the YouTube videos and Google videos communicating online are of the Flash Video file, or FLV file format.
  • What is FLV?
    FLV, or Flash Live Video file, is a preferred file format that is designed for web playback, offering high rates of compression to deliver video over the Internet using Adobe Flash Player.
    FLV content cannot be played back directly but must be embedded in (or linked from) an SWF file. You create (or download) a “container” SWF file from which to play the FLV file. The most common approach is to use an SWF file that functions as a media player with screen and playback controls. Notable users of the FLV format include YouTube, Google Video, Reuters.com, Yahoo! Video and MySpace.
  • What is AAC?

    Advanced Audio Coding (AAC) is a standardized, lossy compression and encoding scheme for digital audio. AAC is promoted as the successor to the MP3 format by MP3’s creator, Fraunhofer IIS.

    Depending on the encoder used, AAC generally achieves better sound quality than MP3 at the same bit rate, particularly below 192 kbit.

    AAC’s most famous usage is as the default audio format of Apple’s iPhone, iPod iTunes, and the format used for all iTunes Store audio (with extensions for proprietary Digital Rights Management (DRM) where used).

    AAC is also the standard audio format for Sony’s PlayStation 3 and the video standard. HE-AAC is part of digital radio standards like DAB+ and Digital Radio Mondiale.

  • Install and launch Moyea FLV to Video Converter Pro 2

  • Add FileClick on the “Add FLV” button on the tool bar to import your target FLV files into the program. You can preview the files before importing.
  • Change the Output SettingsYou can select the output path by clicking the folder icon right behind “Export to…“.Select Audio/ Audio AAC in the drop-down list of “Export format“.
  • Click “Settings” and you could start to adjust the settings of the FLV for your output to play on portable devices. You can change the bit rate, audio codec, and sample rate of the Audio,
  • Start ConversionClick “Convert” and “Start” to start to convert the files on the file list to the output folder.

FLV to 3GP: Convert FLV to 3GP with Moyea FLV to Video Converter

FLV to 3GP: Convert FLV to 3GP with Moyea FLV to Video Converter Lite

This article is to show you how to convert video files from FLV (Flash Video) to 3GP (3GP Mobile Video) for enjoying your favorite FLV on mobile phone anytime, anywhere.
If you are a MAC user, this guide tell you convert FLV to 3GP on MAC.

How to download video from YouTube?

You can use a free tool named FLV downloader,which will download video from Youtube, Google Video, MySpace, Metacafe, Dailymotion, iFilm, Music, eVideoShare, StreetFire, etc., to your computer’s hard drive in FLV format - use FLV player to view it.

What is 3GP?
The 3rd Generation Partnership Project (3G/3GPP) is a collaboration agreement that was established in the 1990s. The 3GPP and 3GPP2 specifications call out specific types of media that exist in .3gp and .3g2 files.
Once you transfer a video file from mobile phone to your PC, the easiest way to play it is to use Apple’s QuickTime Player.

In general, if a mobile phone is to record a 3GP video, it should conform to the 3GP standard. However, a mobile phone may not have the ability to play all variety of 3G2 videos due to limited codec support on the phone. Thus, it is easy to convert a 3GP mobile video to a format playable on a computer, but it is not so easy to convert a PC video to a 3GP which is compatible with your particular brand of cell phone.

Moyea Software has handled a range of headaches about converting PC videos to 3GP videos which are compatible with mobile phones.

Here is the solution of converting FLV to 3GP with Moyea FLV to Video Converter Pro2.

1. Install and launch install the Moyea program of FLV conversion.

Here is the main interface:
When you have installed Moyea FLV to Video Converter Lite, launch the program.


2. Add FLV

Click on the “Add FLV” icon to import the target FLV files into the program. The program supports FLV files by various codecs, including On2 VP6, H263, Nelly Moser audio, etc.
add flv files

3. Edit

Here you can crop and trim the video, add logo and text to it as well as adjust the video effect.

4. Settings
Check the “Settings” button, and then you can adjust the video and audio settings.

settings
Select 3GPP in the drop-down menu of “Export format”, all the audio and video settings will change accordingly. Then
you can adjust the video and audio settings in accordance with your particular needs: the video and audio codecs, bit rate, etc.
By the way, the converter has provided an access to view the basic information of the source FLV files for reference when setting the video and audio parameters: click the graphic icon in the red square and then most of the basic information will be displayed in a semi-transparent box like below:

settings

5. Select the output directory and convert
Now you can determine the file path for your output 3GP video file by clicking the folder icon behind “Export to…box, and click on “Start” to activate the encoding process.

Thursday, March 19, 2009

How to Convert FLV to 3G2 (3GPP2 Mobile Video) with Moyea FLV to Video Converter

What is 3G2 and FLV?
The Third Generation Partnership Project (3G/3GPP) is a collaboration agreement that was established in 1990s. The 3GPP and 3GPP2 specifications call out specific types of media that can exist in .3gp and .3g2 files.
If a cell phone records a 3G2 video, is should conform to the 3G2 standard. However, a cell phone may not have the ability to play all variety of 3G2 videos due to limited codec support on the cell. Thus it is easy to convert a cell phone 3G2 to a video format playable on a PC, but it is not so easy to convert a PC video to a 3G2 that is compatible with your particular cell phone.

FLV (Flash Video), however, is a preferred file format for delivering video clips on the web using Adobe Flash Player. Yet FLV files cannot be played back directly and they must be embedded in (or linked from) an SWF file. The most common approach is to use an SWF file that functions as a media player with screen and playback controls to play back the FLV files.

This article is to show you how to convert FLV (Flash video format) to 3G2 (3GPP2 Mobile video format) with Moyea FLV to Video Converter.
In order to finish this guide, please install the Moyea program of FLV conversion.
Launch the Converter and add file
Once Moyea FLV to Video Converter is installed, launch the Converter:

Click on the “Add File” button on the tool bar to follow the instruction to import target FLV files into the program.

Adjust the Settings
Click on “Settings” button to activate the audio and video settings panels. (Before starting Settings, make sure that the imported FLV file is playing in the preview panel.)

By selecting the file format “3GPP2″ in the Export Type, you can get the .3g2 video for the generated file.

For the video settings, you can adjust the settings in the panel of “Include Video in Output File”, including the video codec/compressor, the frame rate, the frame size and the bit rate of the video.

For the audio settings, you can specify the settings in the panel “Include Audio in Output File”. You have the options to set: the audio codec, the sample rate, the bit rate and the channels.

Select the Output Directory and Convert
After specifying the settings for you output 3G2 video file, you can select a proper output directory on your hard disc for the created video, and click on “Convert” button to proceed with the conversion.

 
3gp to swf| convert video to flv| create flash video| create web video| encode flash video| flash encoder| put flv video on website| flv player skin| m4v to flash| mkv to flash| mov to flash| mov to swf| mp4 to flash| mpeg to swf| convert mpg to swf| ogm to swf