Friday, April 10, 2009

Play FLV in Windows Media Player

Many people now may have the questions about their copies of Windows Media Player. How to make FLV videos play in Windows Media Player? As we know, Windows Media Player can accept most of popular video formats but FLV is with on luck.


Now learn more about Window Media Player:

Supported video formats:

ASF, WMA, WMV, AVI, MOV, MP4, MP3, MPEG, RM and more

Versions of Windows Media Player that support these file types:

Windows Media Player 7
Windows Media Player for Windows XP
Windows Media Player 9 Series
Windows Media Player 10
Windows Media Player 11

Back to FLV video format, it is very popular video format over the internet nowadays. How to make Windows Media Player play FLV freely? I will provide three solutions for this question.

1. Deal with it using the codec.

Download a suitable codec for the specific video formats. instead of just randomly downloading codecs with the hope that one of them works, I’d recommend downloading a codec tool that will analyze your particular video file and tell you exactly what codec(s) you’ll need to play the files. Here is a free tool that will do this for you: Gspot (http://www.headbands.com/gspot/). This will tell you what codecs you need to get the particular file running properly, without making you download anything that you don’t need. A lot of times codecs can conflict with one another, and overloading your system with a whole them is never a good idea, and having multiple amounts of them on your system can sometimes cause more harm than good.

2. Convert FLV to other video format.

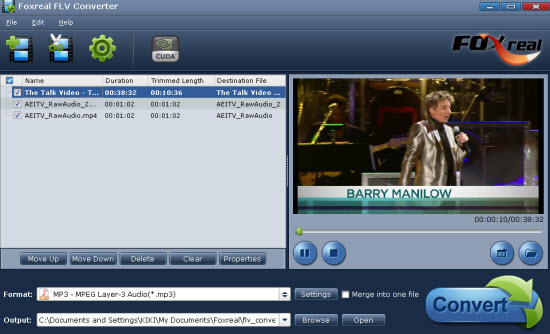
Use Moyea FLV to Video Converter Pro 2 to convert FLV to WMV, FLV to AVI, FLV to MOV, FLV to MP4, etc. which are acceptable by Windows Media Player. With this way, you can freely watch FLV video content in Windows Media Player. The program I recommended has the batch processing function. It will easily convert lots of FLV files to Windows Media Player.

Simple steps to convert FLV to WMV:

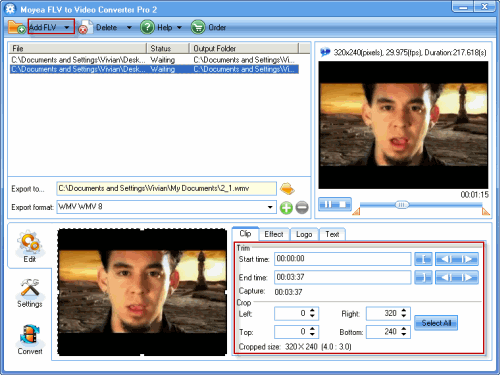
Install and run the software as well as importing FLV.

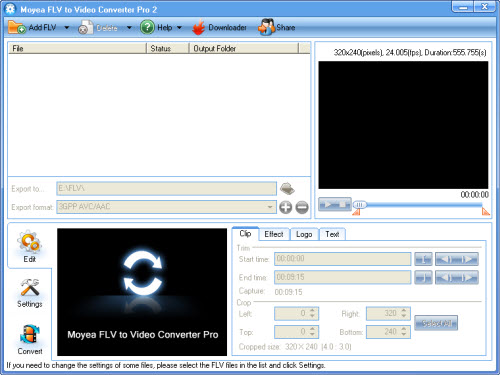
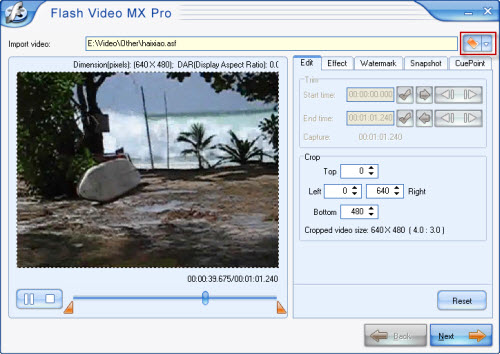
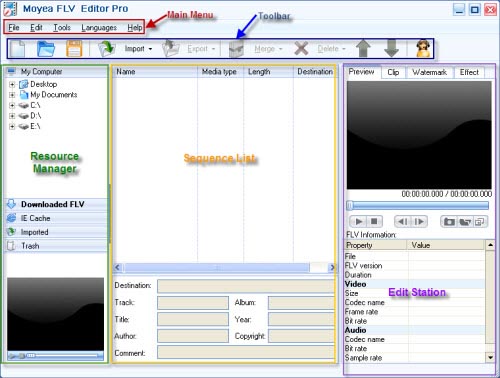
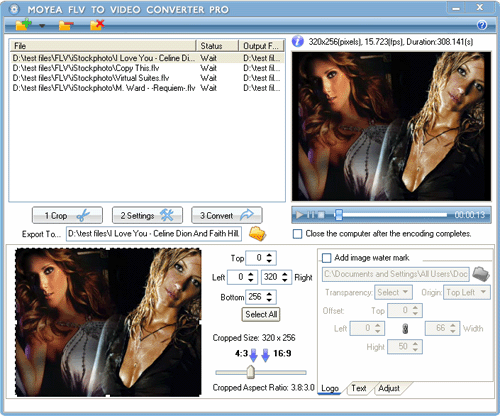
Click “Add FLV” button to input FLV and you will see the following interface:
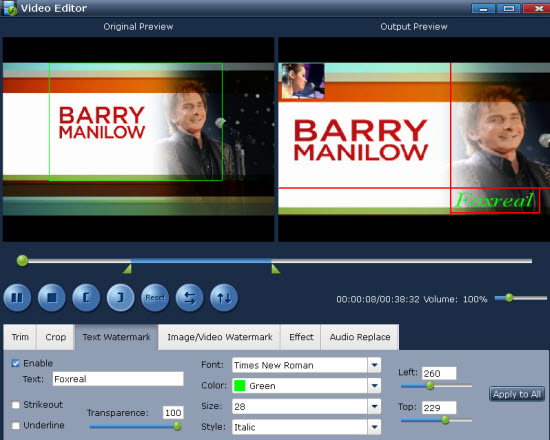

Edit FLV

In “Edit” tab, there are four boxes to edit FLV.

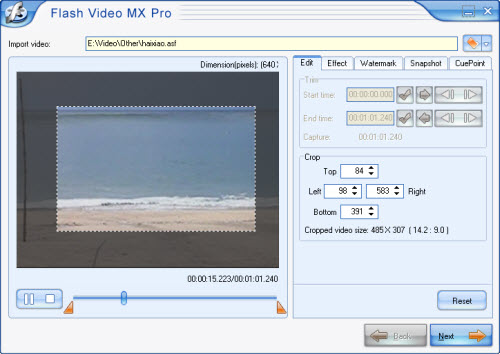
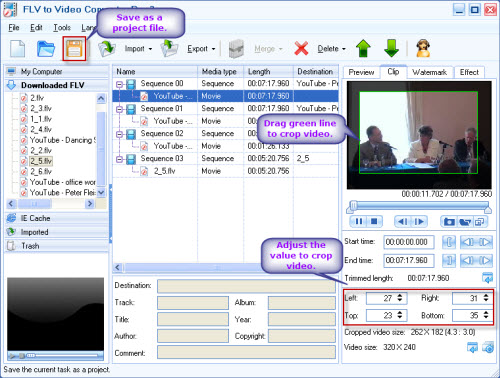
a. Clip: Trim and crop the video.
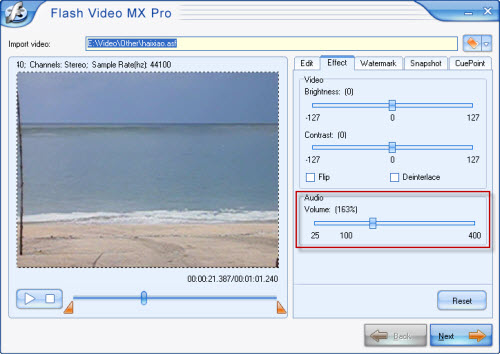
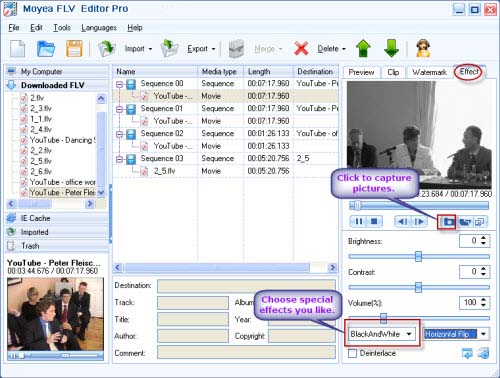
b. Effect: Adjust the brightness, contrast and volume.
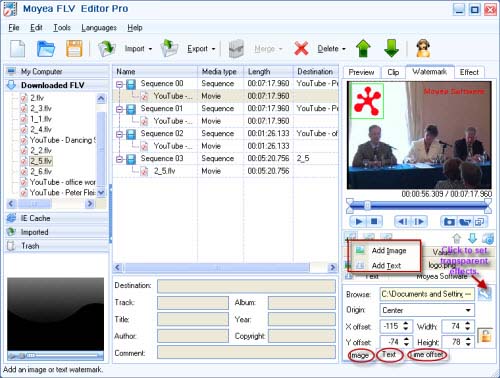
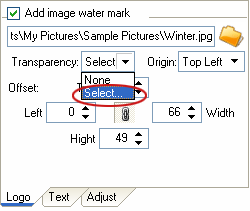
c. Logo: Add the image watermark to the video.
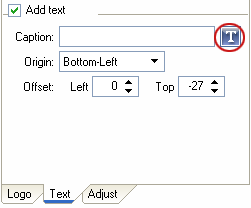
d. Text: Type in the words as the text watermark.

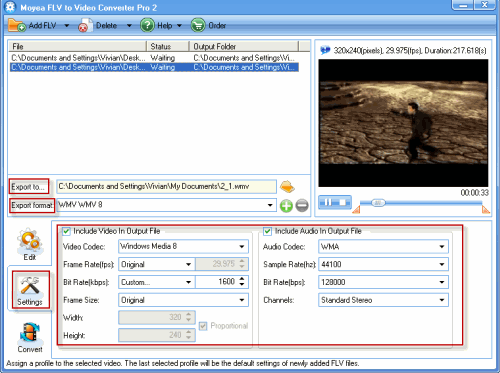
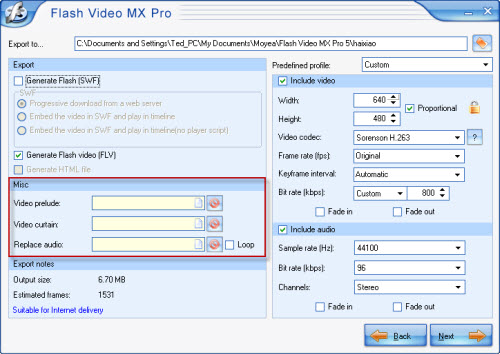
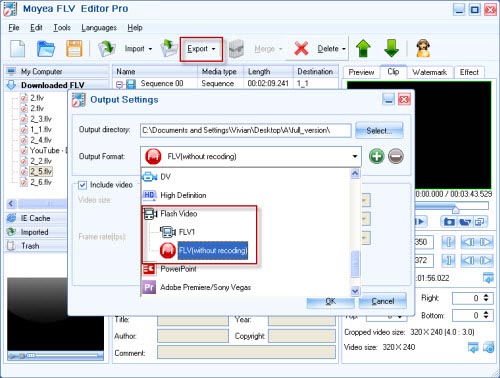
Set output settings.

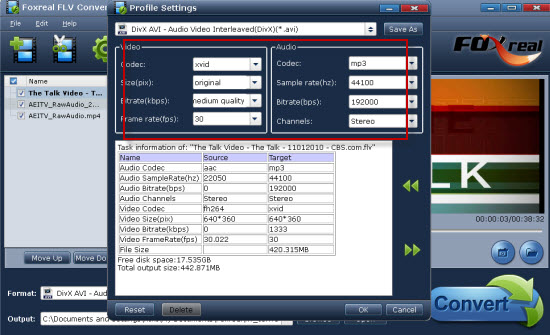
Specify the output format to WMV in “Export format” and choose the location for the output folder in “Export to…” box. If you want to change the video/audio parameters, you can click “Settings” tab. There you can adjust the bit rate, frame rate, frame size and more parameters.
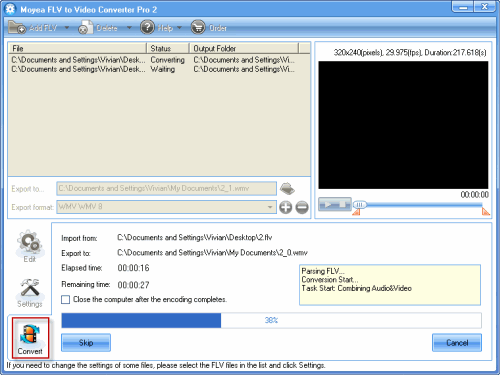
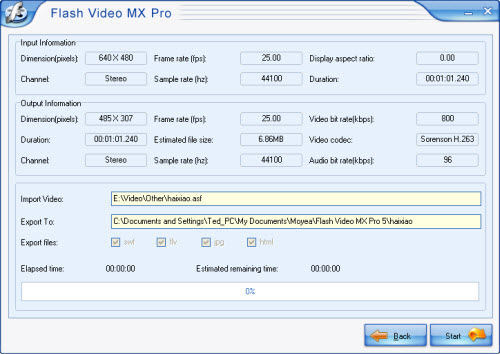
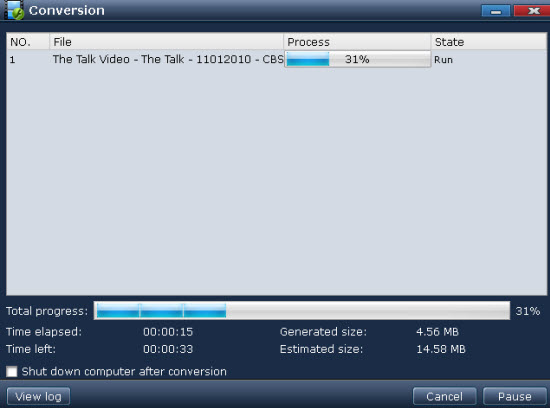
Convert FLV to WMV.

Click “Convert” tab and hit “Start” icon. The recoding will begin. You can find the output WMV files where you specify the location. Here import WMV video files to Windows Media Player to enjoy them.

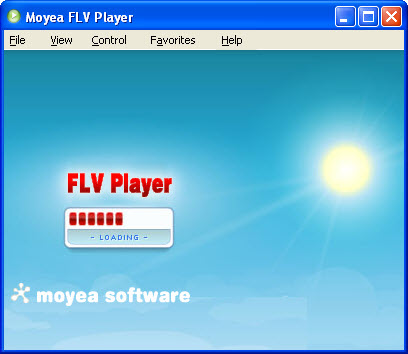
3. Install Moyea FLV Player to view FLV files.

If you are not satisfied with these two methods above, then you can enjoy FLV in FLV Player directly and give up Windows Media Player. With this player, you can view FLV with full screen, see the related FLV information and Capture a picture as the thumbnail.

Run and install the software. You can see the main interface

Learn more about how to use FLV Player at http://www.flvsoft.com/h264flv-player


Regardless which solution you choose, it is so easy to enjoy FLV in your PC.

How to Convert FLV to WMV for Sony Vegas

As an editing tool, Sony Vegas is a popular with many folks without a doubt. But most people get the video materials from YouTube. They will get lots of FLV video materials. It is well known that Sony Vegas is not compatible with FLV. It accepts WMV. Therefore, this problem will be solved as long as we convert FLV to WMV.

  • How to convert FLV to WMV:

  • I recommend a program called Moyea FLV to Video Converter Pro 2. It is a professional and easy to use conversion tool. You can convert FLV to AVI, FLV to MPEG, FLV to MP4, FLV to MP3, FLV to 3GP, FLV to MOV and more. Apart from this conversion function, it owns the useful editing functions like trim and crop video clips, add the watermark as well as adjust the video effects.

  • Simple steps to convert FLV to WMV:

  • 1. Run and download FLV to Video Converter Pro 2.


  • 2. Add and edit FLV.

  • Click “Add FLV” button and edit FLV in the tabs including “Clip”, “Effect”, “Logo” and “Text”.

  • 3. Choose the output folder and output format WMV.

  • Meanwhile, in “Settings” tab, you can adjust the video/audio parameters like bit rate, frame rate, frame size and so on.

  • 4. Start conversion.

  • Click “Convert” tab and hit “Start” icon to begin encoding WMV.

  • Now WMV files have been encoded. You can easily import them into Sony Vegas for editing.

    Tips for free tools to download YouTube videos:

  • a. The online download and conversion web site: http://www.convertdirect.com which works for Mac and Windows OS.

  • How to do it:

  • 1. Type in the URL of this FLV.
    2. Choose the output video format like AVI, MPEG, MP4, MP3, WMV, MOV, 3GP and more.
    3. Type in your email box address.
    4. Click “Submit”.

  • Then soon you will get the converted files in your email box.

  • b. Take advantages of free downloading software.

    The main interface:

  • Get more detailed operating steps at http://www.flvsoft.com/capture-youtube

    How to convert ASF to FLV?

    Have you ever thought about to concert your ASF video to FLV? Because you can upload the FLV file to YouTube with no difficult, and you can reduce your ASF video’s size but will not loss the quality. But how to convert ASF to FLV? I suggest you to use Flash Video MX Pro.
    This software is not just powerful but also easy to operate; just follow these simple steps to enjoy perfect experience.

    1). Install and launch Flash Video MX Pro
    This is the main interface; input ASF to convert by clicking open button (in red):

    2). Editing
    A). Crop the video size as well as adjust the video effect by "Edit" and "Effect" functions:

    B). "CuePoint" also is a very powerful feature:
    A "navigation" cue point allows you to seek to a particular frame in the FLV file because it creates a key frame within the FLV file as near as possible to the time that you specify.
    An "event" cue point enables you to synchronize a point in time within the FLV file with an external event on the web page.
    C). Generate a picture as the first frame of the output file by the snapshot function if needed.
    D). Add watermark on your video.
    Choose Watermark section, press add button, and you can choose add an image or a text watermark.
    E). Set the volume of the video.
    In this section, you set some effects on your video, like set the Brightness and Contrast. And you also can increase or reduce the audio’s volume.

    3). Replace audio
    Click "Next" to this interface, in "Misc" section, you can replace the original audio with others you like. As you see, in Replace audio section click this button: to find the song you want to add.

    This software gives you 3 choices to choose: "Generate Flash video (FLV)", "Embed the video in SWF and play in timeline", and "Generate HTML file". Or if you just want a FLV file, you can disable Generate Flash (SWF) and Generate HTML file. And if you want to upload your video on your website you had better to generate the SWF file and the HTML file which can be used as a webpage directly.

    4). Add player skins
    Here are various player skins, preloaders and special effects right for you to decorate your video into the best one in your mind.

    5). Convert
    Click "Start" and wait a few minutes you will get your .flv file.

    Thursday, April 9, 2009

    A simple analysis on FLV Editor Pro and FLV Editor Ultimate

    • Lately Moyea has released a new FLV editor, FLV Editor Ultimate. It is the full retail version from FLV Editor Lite. Compared to its previous FLV editor, FLV Editor Pro, you may ask what the difference is between them, and why they are designed into two programs with different names. Actually, both of them are similar at FLV editing, but the output formats are different which makes them different direction: FLV Editor Pro helps edit and convert FLV to other video formats for your portable devices like iPod, iPhone, PSP, Xbox, Pocket PC, etc.


      FLV Editor Ultimate helps edit and output FLV, SWF, and HTML for uploading online. The edited FLV can also be converted by FLV to Video Converter Pro 2 (free trial), if you’d like to play them on your portable devices.


      The following will analyze in detail.

      1. Import FLV
      Pro: FLV encoded with H.263, Flash 8, and Flash 8 with alpha, etc. No H.264 FLV and F4V support currently.
      Ultimate: MP3, FLV encoded with H. 264, Flash 8, and Flash 8 with alpha, etc. No F4V support currently.

      Both of them support FLV imports while Ultimate supports H.264 FLV, but FLV Editor Pro does not.


    • 2. Export format
      Pro: FLV, AVI, MPEG, MP4, 3GP, MOV, WMV, MP3, WMA, AAC, etc.
      Ultimate: FLV, SWF, HTML

    • It is clear that other than the simple FLV output FLV Editor Pro is more for portable devices, while FLV Editor Ultimate is for uploading online.

    • 3. Editing functions
      Pro: trim video, merge video, crop video, add special effects on video, flip video, add image and text watermarks, adjust brightness, contrast, and volume, deinterlace, set metadata, set video size, video/ audio bit rate, sample rate, audio channels, edit with short-cut keys, save project file for future editing, edit in sequences, etc.
      Ultimate: trim FLV, merge FLV, add special effects to SWF, cut FLV, rip FLV video and audio, replace audio, add metadata and cue point, edit with short-cut keys, save project file for future editing, edit on timeline, etc.


    • Some editing functions are similar but they are realized in different ways. FLV Editor Pro exports both recoded FLV and FLV without recoding, while Ultimate only exports FLV without recoding. A detailed comparison at this aspect will be made in the following passage.
      4. Cooperation with other programs
      Pro: YouTube FLV Downloader
      Ultimate: YouTube FLV Downloader, FLV to Video Converter Pro.


    • In this section, FLV Editor Ultimate is more flexible than FLV Editor Pro. You can not only export SWF and HTML files to upload online, but also export to FLV to Video Converter Pro 2 for enjoying on portable devices. But you must buy another program or use the free trial version.
      Besides, you can right click on downloaded FLV file in YouTube FLV Downloader and select edit to launch FLV Editor Ultimate directly (if installed). You cannot launch FLV Editor Pro with the downloader.


      Detailed analyze on editing functions of the two.


    • Save project file
      Pro: Project file name: *.ftvx.
      Ultimate: Project file name: *.mft.


    • Trim video:
      Pro: You can trim the video by dragging the bar or set the exact value as start time and end time under Clip tab.


      Ultimate: You can trim the FLV on Timeline by dragging the edge of a clip. Detailed information like clip name, start time, end time, and duration will show at the same time. Or you can drag the pointer to right position and click scissor button to cut, select the unwanted part and click "X" to delete. Since you can drag multiple FLV/ MP3 clips on Timeline, you can trim the blank parts among them with right-click menu on Timeline.


    • Crop FLV
      Pro: Under Clip tab, you can crop FLV by dragging the edge on preview window or set the exact value of left, top, bottom, and right.

    • Ultimate: No such function.

      Merge video
      Pro: To merge FLV files into a single one, you can import or drag them into a same sequence. One sequence will be output as a single file. You can also select separate sequences on list and click Merge or Copy Merge.


      Ultimate: To merge several FLV files into one, you can import and drag the files to Timeline. No mater how many clips you have placed on Timeline, they will be exported as a single file.


      Trim Blank
      Pro: No such function.
      Ultimate: To trim blanks among clips on Timeline, you can right click on the blank and select "Trim Blank".


      Cut video
      Pro: No such function.
      Ultimate: You can cut a clip on Timeline into any pieces you like with the pointer and scissors button.

      Rip video and audio
      Pro: In Export window of FLV Editor Pro, you can select whether to include video or audio.
      Ultimate: You can select clip on Timeline and click Unlink button to rip the video and audio, and then you can drag and move the audio and video separately. Also you can replace the audio freely. You can delete any part by selecting and clicking "X".

      Undo function
      Pro: No such function. But if you have deleted a clip, you can find it in Trash section with all settings you have done to the clip. You can drag the file back to sequence area for further editing.
      Ultimate: You can click the Undo button to cancel previous action and click Redo to resume the action.

      Add Metadata
      Pro: You can add metadata to a sequence, like Destination, Track, Album, Title, Year, Author, Copyright, and comments.
      Ultimate: You can add any metadata named by yourself.

      Add Cue Point
      Pro: No such function.
      Ultimate: You can add event and navigation cue points to the FLV. But to realize the effect, you must make a player with ActionScript commands by yourself.

      Add Watermark
      Pro: You can add text and image watermark and set the exact time and position to show the watermarks.
      Ultimate: No such function.

      Add Special effects
      Pro: Under effect tab, you can select InvertColor, BlackAndWhite, Purple, etc. to get the video unique.


      Ultimate: If output SWF files, you have 30 player skins, 14 special effects, and 16 preloaders options to make the video special. You can even order your customized player skins and preloaders by emailing the technical support.


      Real-time preview
      Pro: You can real-time preview with the top-right window or click Float window button to see the effect in original size in float window. You can right-click and select the size.
      Ultimate: You can real-time preview the effect on Timeline by clicking the play button on Preview Pane. What you see is what you get.

      Short-cut keys
      Pro:
      Ctrl+N: Create a new project.
      Ctrl+O: Open a project.
      Ctrl+S: Save project.
      Ctrl+Alt+S: Save project as.
      Ctrl+K: Expand all sequence menus.
      Ctrl+J: Collapse all sequence menus.
      Ctrl+Delete: Clear all sequences on list.
      Delete: Delete selected clip or sequence.
      F1: Launch Help content.

      Ultimate:
      Ctrl + A: Select all clips on Timeline.
      Ctrl + Z: Undo or redo;
      Ctrl + left/right: Move the selected clip or clips on Timeline;
      Ctrl + click on clip: Select or deselect multiple clips on Timeline.
      Delete: Delete selected clip or clips on Timeline.

      No matter what program you are using, you can implement your great ideas to FLV files, and show it to friends or upload online. You will find your gift at FLV editing.

    How to add a control bar on your FLV video?

    • “I have some FLV videos and I want to add a control bar on it, you know with play and stop button. Better have the full screen button.” Do you have the same problem? Do you want to add a beautiful player skin on your FLV so your client would be avoided to watch an ugly video without any control function even a play button? Well, actually you just need good software. I recommend you to use Moyea FLV Editor Ultimate, this software can help you to edit your FLV like trim the video, cut/replace the audio, and add CuePoint and MetaData.

      This article will tell you how to add a control bar on your FLV video with Moyea FLV Editor Ultimate. As this software will not re-code your FLV so you needn’t worry about losing quality.

      Install and launch the software, you can see the main interface:

      After you import your FLV, we can start.

      Step1. Import your FLV and edit it on the timeline.

      You can import your FLV by just drag it into in the resource list, and drag it to the timeline to do a further edit.

      Here you can unlink the video and audio, and then you can cut the video or audio and export it without audio/video. Or you can import a .mp3 file to replace the original audio. When you were editing your FLV you can watch your settings in the preview window.

      Step2. Add a control bar, a preloader and special effects on your video.

      Click this button to add player on your FLV and export it as SWF.
      After you click the above button, you will see this interface.

      As you see you can choose many beautiful player, preloader and special effects to add on your FLV. The free Lite version also can do it but it can only add player with Moyea logo and Navigation on Click also been limited.
      For Ultimate version, you can also order your customized player skins and preloaders by emailing us your detailed requirements. The email address is support@exp-flv.com.

      You can see the limitation on the above picture.

      Step3. Export the SWF file.

      After all the settings, just press OK into this interface.

      Press Start to export your file with beautiful player. Here you can change the export folder of your file, and you can only change it once then the software will remember the path, so next time you would not need to re-set it again.

    Wednesday, April 8, 2009

    How to Edit FLV with FLV Converter?

    Considering the individual or business use, you may need conversion and editing program. Regardless of personal entertainment or business affair, Moyea FLV Editor Pro convert FLV to various video formats, what is more, its powerful editing function will give you a strong attraction. In view of these two points, the program stands out among so crowed of FLV conversion tools in market.

    Now let’s learn about the editing function you may be interested in:

    1. The program provides these two free functions:

    Trim and Merge:

    Trim and join FLV as long as you choose the option “FLV without recoding” for output. You may need most attracting part remained or just want the video clip smaller in size. No matter which is your aim, with this trim feature, you will be satisfied greatly. Moreover, using the program, it is free as well to join several FLV files into one video clip in FLV format. No watermark and no time limit! Just absolutely free for you!

    2. Add watermark:

    The program provides watermark adding function. You can add image watermark to highlight your company’s logo. Or add text watermark like author name or other useful information to protect the copyright. Moreover, it is easy for to get transparent effects of watermark background.

    3. Crop the video clip and save as a project file.

    Crop the video area in the screen for you. It helps cut off unwanted parts of the video area, especially the boring black edges. In addition, it is easy to operate, just drag and drop! For business man, the function to save as a project file seems more convenient. Save the edited FLV files ending with *.ftvx and open them anywhere. Just continue using or editing without the location limit!

    4. Capture still pictures and insert special effects.

    If you want to make a photo album and need each picture of the video, the program can help you out absolutely. Capturing pictures of each frame just needs one click. In addition more special effects are offered to make your video clips different like Emboss, BlackAndWhite, Engrave and so on.

    5. Integrated download tool

    FLV to Video Converter Pro 3 has integrated YouTube Downloader. You can run it and download FLV from YouTube, Google Video, MySpace, etc. After shutting down FLV downloader, just refresh in “Downloaded FLV” tab of Resource Manager. The downloaded FLV files will appear. You can drag directly FLV into the sequence list for later editing.

    6. Convert FLV to FLV

    Besides converting FLV to other video formats, the program can convert FLV to FLV. You have two choices: FLV1 encoding with H.264 and FLV without any recoding. If you choose to output FLV without any recoding, then Trim and Merge functions are totally free for you!

    7. Easy-to-use interface

    Apart from these main powerful functions, it owns some small functions for convenient use. Multiple preview windows are offered including real-time preview, import preview, conversion preview and original FLV preview. Moreover, you can preview with the float window and the stretchable interface let you use it with full screen or smaller screen.

    Just enjoy powerful conversion and editing tool:FLV Editor Pro!

    How to Watermark Video Files Converted From FLV for Better Delivery?

    For individuals and instructors, you may feel the need to convert FLV files downloaded from YouTube, Google Video, etc to various video formats. Most probably you have such an edited video and want to share with others. Then how can you personalize the file with watermarks to let people know that this is your personalized video and not someone else’s? How can you overwrite the logo of YouTube, etc and add the brand name of your company or add text watermark on the video files? This article is to address the issue of converting and watermarking video files from FLV.

    Searching through the web, you can find lots of such converters, few of them have the function to add watermarks to personalize the generated video files. This article may be of some help to you if you are looking for such a function. Now enjoy reading it.

    Moyea FLV to Video Converter is a one-stop solution to converting downloaded FLV files to the desired video formats and watermarking the video files for playback on portable devices. With the personalized watermark, you will increase your exposure in the public and protect your original efforts.

    FLV to Video Converter to Watermark the Video
    Moyea FLV to Video Converter Pro is a powerful tool to convert Flash video (FLV) files to conventional video files. It perfectly converts FLV files without the support of extra codecs, such as On2 VP6 video FLV, H.263 video FLV, Nellymoser audio FLV, MP3 audio FLV, and audio-only FLV; and could output various video formats, including FLV to AVI, FLV to MPEG, FLV to MP4, FLV to 3GP, FLV to MOV, etc.
    Most importantly, FLV to Video Converter Pro can enable you to add text or logo as watermark for the output video files. You can add logo image of multiple formats: *bmp, *jpeg, *gif, *tiff, *png, etc, or add text caption to the created video files to share with those around you.

    With the watermark function of Moyea FLV to Video Converter, you can:
    Add logo image or text caption as watermark for your videos
    Choose any color for your watermarks
    Change the font style and size for your watermark
    Alter the transparency/alpha channel for your watermark
    Place the watermark at any position of your video screen

    What follows is a tutorial to help your add watermark for a FLV file and convert it to MP4 iPod video file.

    1. Download and Install the FLV to Video Converter
    This useful tool is available at the official website of FLV to Video Converter Pro. After launching the program you can see the main interface:

    This useful tool is available at the official website of FLV to Video Converter Pro. After launching the program you can see the main interface:

    flv to video

    2. Add source FLV into the program and specify the output folder
    Click on the buttonadd_flv_file to import your source FLV files into the program, and you can immediately play back the imported files in the Preview Panel on the interface.
    In the box “Export To…”, you can specify the output folder, or end file path for the created video files.

    3. Add image watermark or text watermark for the created video file
    At the right bottom section of the main interface, you can see the toggles of adding logo image, text and adjusting transparency for the created video.


    With the image watermark, you are enabled to import multiple formats: JPEG, BMP, GIF, TIFF, PNG, etc; you can adjust its transparent color, tolerance, Alpha channel, offset value, position, etc. Click on “Select…” and you the following dialog will pop up for you to set the transparent alpha channel:

    With the text caption watermark, you can adjust its font, style, size, color, Alpha channel, offset value, position, etc, to make it most suitable to meet your needs. Click on “T”, and you can adjust parameters of the text caption in the following dialog:

    4. Configure the video and audio settings for the output file
    Click on the tab “Settings”, you are able to set the different parameters for the video and audio data, including video and audio codec, video frame rate, video and audio bit rate, frame size, audio sample rate, audio channels, etc.
    Most importantly, you must specify the output video format in this step: AVI, MPEG, MP4, etc, for you particular playback terminals.

    5. Convert FLV to your desired video file format
    Click on the tab “Convert” and the program will help you to encode the source FLV file into the proper video format you specified video format.

     
    3gp to swf| convert video to flv| create flash video| create web video| encode flash video| flash encoder| put flv video on website| flv player skin| m4v to flash| mkv to flash| mov to flash| mov to swf| mp4 to flash| mpeg to swf| convert mpg to swf| ogm to swf